
Struggling to find a time for your next client call? You're not alone. Most professionals waste hours each week on emails that go like, "How about Thursday at 3?" "Sorry, I have a conflict then." It's frustrating and it slows you down.
There's a better way. Use a booking link. It lets clients pick a slot that works for them, instantly. This guide shows you exactly how to set everything up — choosing the right platform, setting your availability, customizing your page, connecting your calendar, and automating reminders. By the end, you'll have a system that runs itself.
Table of Contents
- Step 1: Choose the Right Booking Platform 🎯
- Step 2: Set Up Your Availability and Time Zones 🌍
- Step 3: Customize Your Booking Page 🎨
- Step 4: Integrate with Your Calendar and Communication Tools 🔗
- Step 5: Share Your Booking Link and Automate Reminders 📬
- Frequently Asked Questions ❓
- Conclusion 🏁
Step 1: Choose the Right Booking Platform 🎯
Your booking link is only as good as the tool behind it. Pick wisely. Look for a platform that checks these boxes: reliable calendar sync, easy customization, and automation that doesn't require a tech degree.
Start with your must-haves. Do you need video calls built in? Most platforms offer some integration, but the depth varies a lot — some auto-generate meeting links, others just let you paste one in manually. If you're doing back-to-back calls, that difference matters. You don't want to copy-paste a Zoom link for every single booking.
Next, think about branding. When a client clicks your booking link, they should see your brand — not the tool's logo plastered everywhere. Most platforms allow some customization on paid plans, but full domain-level white-labeling (your own URL, zero vendor footprint) is only available in a handful of tools.
Think about automation too. Some platforms handle confirmations, reminders, and rescheduling natively. Others depend entirely on Zapier for anything beyond a basic confirmation email. Native workflows are more reliable — fewer moving parts, nothing breaks when Zapier has an outage.
And consider the free tier carefully. Some tools are genuinely functional for free; others gate the features you actually need behind paid plans. Test before you commit.
Here's how the major platforms compare:
| Feature | Novacal | Calendly | Setmore | SimplyBook.me |
|---|---|---|---|---|
| Two-way calendar sync | Yes | Yes | Yes (paid plans) | Yes |
| Native video integration | Yes (Zoom, Google Meet) | Yes (Zoom, Meet, Teams, GoTo, Webex) | Yes (Zoom on paid) | Yes (Zoom, Teams, Meet) |
| Native automation (non-Zapier) | Yes | Yes (reminders & follow-ups on paid plans) | Yes (email free; SMS on paid) | Yes (all plans) |
| White-label domain | Yes (paid) | Yes (paid) | Yes (paid) | Yes (paid) |
| CRM integration | HubSpot, Zapier, API | Native (HubSpot on Standard+; Salesforce on Teams+) | Native (HubSpot, Salesforce, Zoho+) | Zapier |
Key Takeaway: Choose a platform that offers calendar sync, white-label branding, and native video integration — check that all three work on the plan you're actually signing up for, not just the top tier.
Bottom line: The right platform saves you time and makes you look professional — pick one that handles the heavy lifting automatically.
Step 2: Set Up Your Availability and Time Zones 🌍
Once you've chosen your tool, it's time to tell it when you're free. This sounds simple, but it's where most people mess up.
Start with your working hours — and be realistic. If you only take calls between 10am and 4pm, set that. Block off lunch, deep work blocks, and anything else you want protected. Most platforms let you set recurring weekly hours; use that as your baseline and layer in exceptions for specific days.
The bigger trap is buffer time. If your consultations are 45 minutes, don't let clients book back-to-back. Add 15 minutes between slots. That time is for notes, mental reset, or just getting a glass of water. It sounds small but it compounds — skip it and by your third call of the day you're fried.
On time zones: good booking tools detect the client's local time automatically and display your available slots accordingly. You set your hours in your own time zone; they see it in theirs. If your tool doesn't do this natively, that's a red flag — manual time zone math is exactly the kind of thing that causes missed calls.
Also set a minimum notice window. Don't let clients book a slot 20 minutes from now. Set at least a 2-hour lead time, or 24 hours if you need prep time before calls. It also filters out low-intent bookings — someone who can't plan 24 hours ahead is probably not your best client.
Finally, keep your main calendar synced and up to date. If your booking tool reads from your Google Calendar or Outlook, any personal appointment you add there will automatically block that time in your booking page. This is the only reliable way to prevent double-bookings without manually managing two systems.
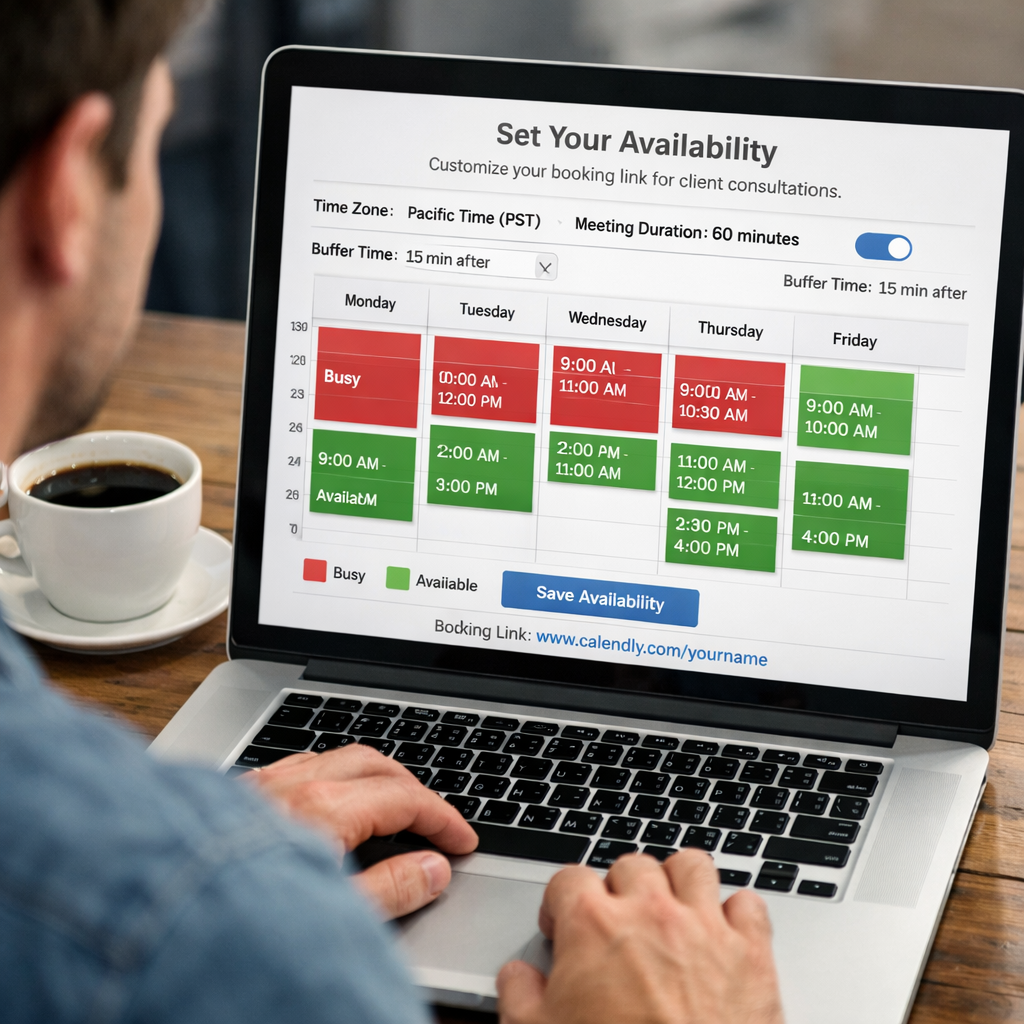
Bottom line: Set clear availability, use automatic time zone detection, and sync your calendar to avoid conflicts — this is the foundation of a reliable booking system.
Step 3: Customize Your Booking Page 🎨
Your booking page is often the first thing a client sees before they talk to you. It should look professional and reflect your brand — not feel like a generic SaaS product page.
Start with the basics: logo, brand colors. Most tools support this. If you want to go further and use a custom domain (like book.yourbusiness.com), check whether that's available on your plan — it makes a real difference for trust, especially with enterprise clients.
More importantly: add intake questions. Ask for the information you need before the call. "What's the main challenge you're looking to solve?" or "Which service are you interested in?" This does two things — it helps you prepare, and it filters out people who aren't serious. Someone who can't answer a two-sentence question probably isn't going to show up.
Keep the form short. Three to four fields max. A long intake form will kill your conversion rate. You can ask follow-up questions on the call.
Make your event types clear. "30-minute discovery call" and "60-minute strategy session" should look and read differently. Add a short description to each — one or two sentences explaining what the client can expect. Don't make them guess.
Check mobile. A large share of bookings happen on phones, and a lot of booking pages look terrible on small screens. Go through the full booking flow on your own phone before you share the link anywhere.
Key Takeaway: A branded booking page with custom questions and a clear flow turns a simple link into a professional client experience.
Bottom line: Customize every visual element to match your brand and add relevant intake questions — it makes you look prepared and saves time during the call.
Step 4: Integrate with Your Calendar and Communication Tools 🔗
Your booking tool needs to talk to your calendar and your meeting apps. Without this, it's just a pretty link.
Connect your primary calendar first — Google Calendar, Outlook, or Apple Calendar. Give it read and write permissions. Read access lets it block time when you're already busy. Write access means new bookings automatically appear on your calendar without any manual entry.
Two-way sync is non-negotiable. One-way sync (where bookings appear on your calendar but changes there don't feed back) creates gaps. You add a personal appointment, forget to update the booking tool, and suddenly someone books over it.
Connect your video conferencing next. When a client books, the tool should automatically create a meeting link and attach it to the confirmation email and calendar invite — for both of you. If you're doing this manually for every booking, you're doing it wrong.
If you use a CRM, connect that too. Most platforms integrate with HubSpot or Salesforce directly, or via Zapier if not natively. A native HubSpot integration can automatically create or update a contact record and save a surprising amount of admin time over a month.
Bottom line: Proper integration removes manual work — sync your calendar, connect video conferencing, and link your CRM to keep everything in sync.
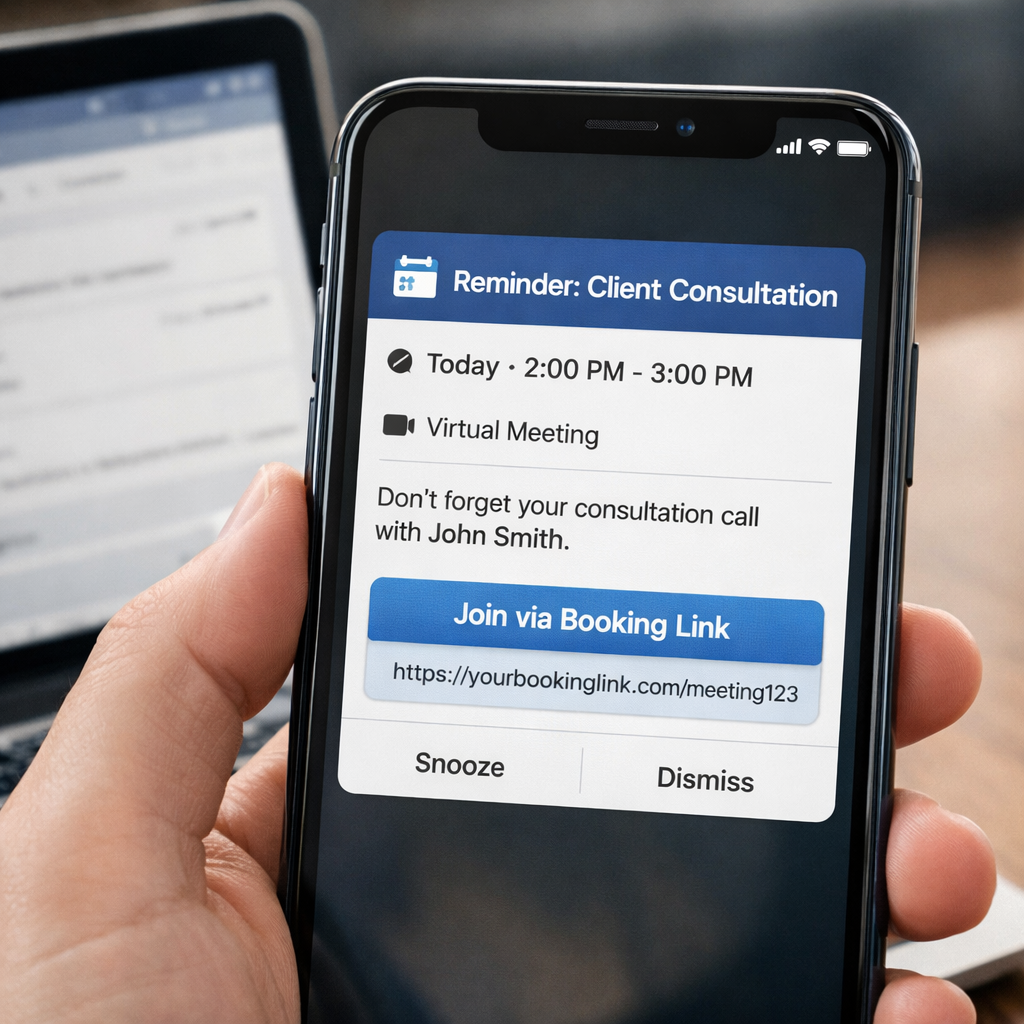
Step 5: Share Your Booking Link and Automate Reminders 📬
Your booking link is ready. Now get it in front of clients.
The highest-ROI placement is your email signature. Every email you send is a potential booking. After that: your website header or navigation (a dedicated "Book a Call" button), your LinkedIn profile, and any follow-up emails you send after a lead comes in.
The reminder sequence is where you get your no-show rate down. Send a confirmation immediately after booking with the meeting details and link. Then a reminder 24 hours before, and another one hour before. That three-touch sequence handles most no-shows. Some tools let you add a custom message to each reminder — use it to set expectations or include prep materials.
Make rescheduling easy. Include a rescheduling link in every reminder. Clients who need to move the meeting will — the question is whether they do it via your booking tool (easy, automatic) or by ghosting you (annoying, wastes your slot). The easier you make it, the more they'll actually use it.
If you're running a team, look at routing forms. A client fills out a short form, and based on their answers they get routed to the right person automatically — no manual handoff needed. Worth setting up once you have more than two or three people taking calls.
Key Takeaway: Share your booking link everywhere clients are, and let automation handle reminders — you'll book more calls and miss fewer.
Bottom line: Distribute your booking link widely and automate a sequence of confirmations and reminders to keep clients on track.
Frequently Asked Questions ❓
How do I create a booking link for client consultations?
Sign up for a scheduling platform, connect your calendar, set your available hours, create an event type (e.g., "30-minute consultation"), and customize your booking page. The platform generates a unique URL you share with clients. They click it, see your open slots in their local time zone, and book. The system handles confirmations and reminders automatically.
What features should I look for in a booking tool?
Two-way calendar sync, automatic time zone detection, customizable branding, native video integration, and automated reminders. If you work with a team, check round-robin and routing form support. Prioritize tools where these work natively — not through a Zapier chain that can break.
Can I use my own domain for my booking page?
Yes, several platforms support custom domains. That means you can use a URL like yourcompany.novacal.io instead of a branded subdomain from the tool. It builds trust with clients who notice those things. Check whether it's available on the specific plan you're considering.
How do I prevent double bookings when using a booking link?
Enable two-way calendar sync. Your booking tool reads events from your connected calendar and automatically blocks those slots. When a new booking comes in, it writes back to your calendar in real time. Test it — book a test appointment and verify it appears on both sides.
How can I reduce no-shows with a booking link?
Three-part reminder sequence: confirmation immediately after booking, reminder 24 hours before, reminder 1 hour before. Include the meeting link in every message. Add a rescheduling link too — clients who can't make it are far more likely to reschedule than to tell you in advance, so make that the path of least resistance.
How do I handle clients in different time zones?
You set your availability in your own time zone. The booking tool detects the client's local time zone (usually from their browser) and displays your open slots accordingly. They see the correct local time; you see the booking in yours. You shouldn't have to think about this at all — if you do, your tool isn't handling it correctly.
What's the best free option for scheduling client consultations online?
It depends on your needs. If you want unlimited staff on a free plan, Picktime is worth looking at. If you need native automation and white-label branding from day one, Novacal's free plan covers the core features without requiring an upgrade for the basics.
Conclusion 🏁
You've got everything you need to set this up. Choose a platform that syncs with your calendar, supports your branding, and automates the reminder sequence natively. Set your availability with real buffers, not just raw hours. Customize your booking page so it reflects who you are. Connect your calendar and video tool so nothing requires manual entry. Then share the link everywhere and let automation handle the follow-up.
Done right, you eliminate the back-and-forth scheduling emails, reduce no-shows, and free up mental overhead for the actual work. The setup takes an afternoon. The time you get back is every week after that.
Ready to stop juggling emails and start booking clients? Try Novacal free today — no credit card required.